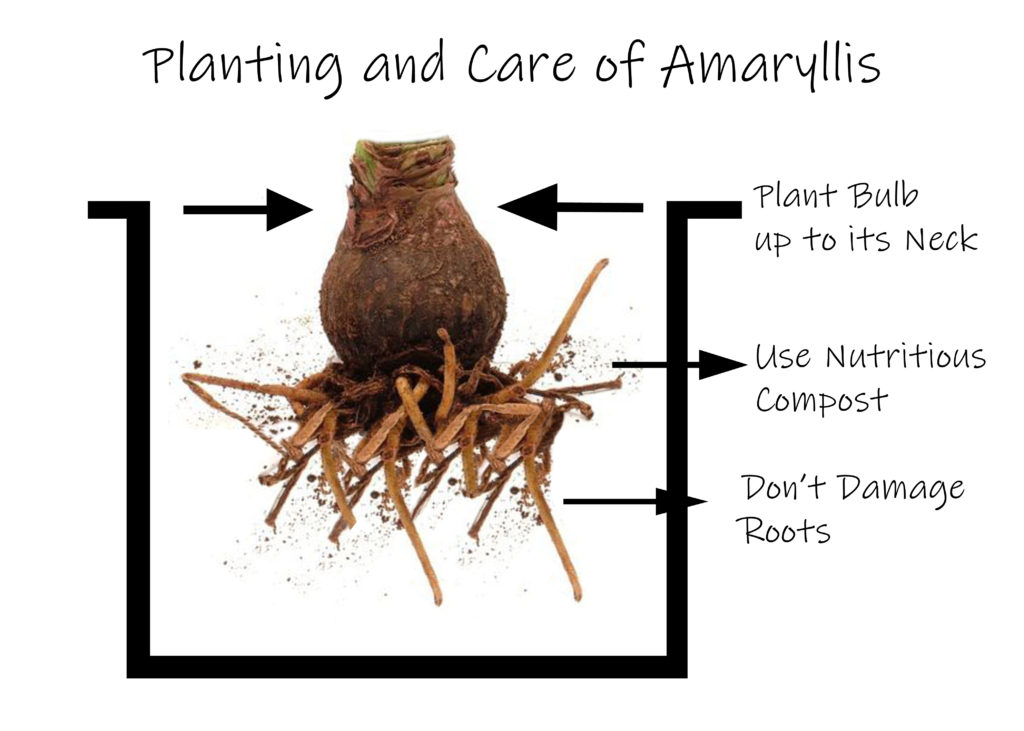
Plant amaryllis bulbs in nutritious potting compost, many are available pre-mixed. Plant the bulb up to its neck in the potting mix with compost, being careful not to damage the roots. Press the soil down firmly to set the bulb securely in place after planting.
Placement and Watering

Plant the bulb, or place the potted bulb in a warm place with direct light since heat is necessary for the development of the stems. The ideal temperature is 68-70. Water sparingly until the stem appears, then, as the bud and leaves appear, gradually water more. At this point, the stem will grow rapidly and flowers will develop after it has reached full growth.
Flowering Period
Bulbs will flower in 7–10 weeks as a general rule. In winter the flowering time will be longer than in spring. Set up your planting schedule between October and April with this in mind.
After-Bloom Care
After-Flowering: After the amaryllis has stopped flowering, it can be made to flower again. Cut the old flowers from the stem after flowering, and when the stem starts to sag, cut if back to the top of the bulb.
Leaf Growth and Development: Continue to water and fertilize as normal all summer, or for at least 5-6 months, allowing the leaves to fully develop and grow. When the leaves begin to yellow, which normally occurs in the early fall, cut the leaves back to about 2” from the top of the bulb and remove the bulb from the soil.
Bulb Storage: Clean the bulb and place it in a cool (40-50), dark place such as the crisper of your refrigerator for a minimum of 6 weeks. Caution: Do not store amaryllis bulbs in a refrigerator that contains apples, this will sterilize the bulbs. Store the bulbs for a minimum of 6 weeks.
Plant Again: After 6 weeks you may remove the bulbs whenever you would like to plant them. Plant bulbs 8 weeks before you would like them to bloom.
GROWING AMARYLLIS: Gardeners in areas where temperatures do not go below 10 (Zones 8-10) can plant Amaryllis bulbs directly in the ground. Choose a site with full sun (at least 6-8 hours of direct sun daily) and well-drained soil. In frost-free areas, plant the bulb with the neck at, or slightly above, ground level. Once growth starts, water only if rain is infrequent and the top two inches of soil are dry. After the leaves appear, fertilize with a balanced fertilizer (such as 10-10-10); repeat once a month through April. From June through September, keep the area dry. If leaves turn yellow, cut them off at the base.
POTTING AMARYLLIS: Pot bulbs individually in 6-7” pots or group 3 bulbs together in a 10-12” container. Begin by placing a well-drained potting mix in a plastic tub. Slowly add warm water and stir with your hand until the mix is moist but not soggy. Then fill the pot about half with potting mix, set the bulb on top of the mix and fill in around the bulb with additional mix. Adjust the position of the bulb as needed, so that the top third of the bulb is exposed. The final level of the mix should be about ½” below the rim of the pot to allow for watering. Firm the mix and water lightly to settle it around the bulbs. Then follow the “Pre-bloom Care” instructions below.
PRE-BLOOM CARE OF AMARYLLIS: Place the pot where the temperature remains above 60. The warmer the temperature (70-80night and day is ideal), the faster the bulb will sprout and grow. Providing bottom heat (by setting the pot on a propagation mat or on the top of a refrigerator) may help stimulate growth. Water only when the top inch of the potting mix is dry to the touch. Watering more frequently, particularly just after potting, can cause the bulb to rot. (If the pot is covered with Spanish Moss, lift the moss and pour water directly on the potting mix.)
Growth generally begins in 2-8 weeks. Certain varieties of Amaryllis may take more time to sprout. As long as your bulb remains firm, be patient and take care not to overwater. Provide ample sunshine (a south-facing window or a sunroom) as soon as the bulb sprouts. Rotate the pot frequently to prevent the flower stalks from leaning toward the light.
HOW TO GROW AMARYLLIS BULBS IN WATER
Using a Shallow Container: Select a wide, shallow container no deeper than 4” with enough room to fit as many amaryllis bulbs as you want. Fill it halfway with gravel or stones. Place gravel or stones around the bulbs until only the tip 1/3 of the bulbs is visible. The gravel holds the bulbs steady and ensures that they remain upright. Add enough water to the container to fill the bottom but not touch the bulbs. The roots will grow down into the water. Don’t let waster touch the bulb. It will cause it to rot. Place the container in a cool, dark room until you see root and top growth, about 2 to 3 weeks. Check the water level daily. The room should remain at 50-60℉. Using an unheated garage is ideal. Move the container into a bright room, but keep it out during the day and do not fall below 60℉ at night. Check the water level daily. It should still not reach the bulbs. The amaryllis will bloom in 6 to 8 weeks after being moved into the bright room and should last for 4 to 6 weeks.
Using a Glass Vase: Select a glass vase narrow enough to keep the amaryllis bulb in the neck, or use a forcing vase. Fill the bottom of the vase with water. Place the bulb in the vase, making sure it does not touch the water. Place the vase in a cool, dark room until you see root and top growth, about 2 to 3 weeks. Move the vase into a bright room but keep it out of direct light. You will have blooms in 6 to 8 weeks.

